Squid 是一款缓存代理服务器软件,广泛用于网站的负载均衡架构中,常见的缓存服务器还有varnish、ATS等。
正向代理服务器可满足内网仅有一台服务器可以上网,而要供内网所有机器上网的需求,也可以用于爬虫的代理访问。在实践中我将Squid作为爬虫代理服务器,实现了多IP切换的功能,将在后续文章中记录实现过程。
安装
系统环境: CentOS 7.0
Squid版本:3.5.20
1. 源代码安装
到官方网站 http://www.squid-cache.org/Versions/ 查找版本号,找到下载链接,以v3.5.20为例,安装步骤如下:
1
2
3
4
5
6
|
cd /tmp
wget http://www.squid-cache.org/Versions/v3/3.5/squid-3.5.20.tar.gz
tar xzf squid-3.5.20.tar.gz
cd squid-3.5.20
./configure --with-MYOPTION --with-MYOPTION2 etc  # 具体参数请参考官方文档
make && make install
|
更多配置详情参考: http://wiki.squid-cache.org/SquidFaq/CompilingSquid
2. 包管理安装
centos 用 sudo yum install squid 即可完成安装。
配置
配置文件位置在 /etc/squid/squid.conf ,修改默认配置文件:
 1
 2
 3
 4
 5
 6
 7
 8
 9
10
11
12
13
14
15
16
17
18
19
20
21
22
23
24
25
26
27
28
29
30
31
32
33
34
35
36
37
38
39
40
41
42
43
44
45
46
47
48
49
50
51
52
53
54
55
56
57
58
59
60
61
62
63
64
65
66
67
68
69
70
71
72
73
74
75
76
77
78
79
80
81
82
83
|
#
# Recommended minimum configuration:
#

# Example rule allowing access from your local networks.
# Adapt to list your (internal) IP networks from where browsing
# should be allowed
# 内网控制,按需修改
acl localnet src 10.0.0.0/8	# RFC1918 possible internal network
acl localnet src 172.16.0.0/12	# RFC1918 possible internal network
acl localnet src 192.168.0.0/16	# RFC1918 possible internal network
acl localnet src fc00::/7       # RFC 4193 local private network range
acl localnet src fe80::/10      # RFC 4291 link-local (directly plugged) machines

# 配置可访问的端口
acl SSL_ports port 443
acl Safe_ports port 80		# http
acl Safe_ports port 21		# ftp
acl Safe_ports port 443		# https
acl Safe_ports port 70		# gopher
acl Safe_ports port 210		# wais
acl Safe_ports port 1025-65535	# unregistered ports
acl Safe_ports port 280		# http-mgmt
acl Safe_ports port 488		# gss-http
acl Safe_ports port 591		# filemaker
acl Safe_ports port 777		# multiling http
acl CONNECT method CONNECT

#
# Recommended minimum Access Permission configuration:
#
# Deny requests to certain unsafe ports
# 拒绝其他非安全端口的访问
http_access deny !Safe_ports

# Deny CONNECT to other than secure SSL ports
# 拒绝443以外的端口访问
http_access deny CONNECT !SSL_ports

# Only allow cachemgr access from localhost
# 允许本机访问
http_access allow localhost manager
http_access deny manager

# We strongly recommend the following be uncommented to protect innocent
# web applications running on the proxy server who think the only
# one who can access services on "localhost" is a local user
#http_access deny to_localhost

#
# INSERT YOUR OWN RULE(S) HERE TO ALLOW ACCESS FROM YOUR CLIENTS
#

# Example rule allowing access from your local networks.
# Adapt localnet in the ACL section to list your (internal) IP networks
# from where browsing should be allowed
# 允许内网
http_access allow localnet
http_access allow localhost

# And finally deny all other access to this proxy
# 拒绝所有
http_access deny all

# Squid normally listens to port 3128
# 默认对外端口为3128
http_port 3128

# Uncomment and adjust the following to add a disk cache directory.
# 设置缓存文件位置、cache目录容量(单位M)、一级缓存目录数量、二级缓存目录数量
# 取消注释
cache_dir ufs /var/spool/squid 100 16 256

# Leave coredumps in the first cache dir
coredump_dir /var/spool/squid

#
# Add any of your own refresh_pattern entries above these.
#
refresh_pattern ^ftp:		1440	20%	10080
refresh_pattern ^gopher:	1440	0%	1440
refresh_pattern -i (/cgi-bin/|\?) 0	0%	0
refresh_pattern .		0	20%	4320
|
按如上设置即可启动squid,本文不详细阐述具体参数的作用,如有需要可查阅相关文档。
文档参考资料:
- http://www.squid-cache.org/Doc/
- squid中文权威指南
运行
初次配置好或者修改缓存文件位置参数(cache_dir)之后,需要运行squid -z 初始化缓存目录
设置开机启动:systemctl enable squid
运行:systemctl start squid
使用
按上述设置仅支持本机或者网段为10.0.0.0/8、172.16.0.0/12、192.168.0.0/16等内网访问,可根据实际情况增加控制参数,或者将文件中http_access deny all 改为 http_access allow all即可支持所有网段访问。
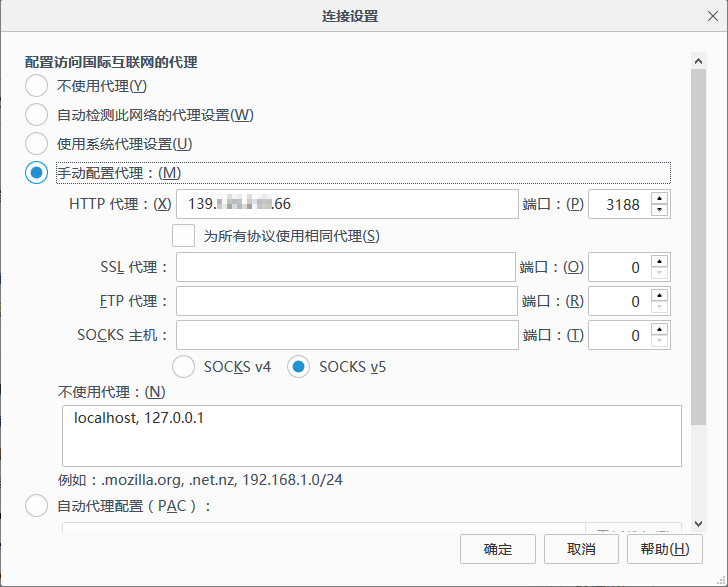
更改浏览器中代理服务器设置,以火狐浏览器为例,填写相应的squid服务器ip和端口号。
访问 http://httpbin.org/ip 检测ip地址
1
2
3
|
{
  "origin": "182.xxx.xxx.148, 139.xxx.xxx.66"
}
|
返回数据中有2个ip,第一个为本机的源ip,第二个为squid代理服务器ip,说明正向代理服务器搭建成功。
文章作者
xNathan
上次更新
2017-02-28
许可协议

本作品采用知识共享署名-非商业性使用-禁止演绎 4.0 国际许可协议进行许可。